Create Beautiful OOAK Jewelry
With these beautiful metal forms you can create rings and bracelets quickly and easily.
Great for giving as gifts, selling at Craft Fairs or for keeping yourself!
In under an hour you can have all of these pieces ready for the oven.
These projects are a great way to use up Mokume Gane slices or leftover canes. Or, use textures and silk screens like we did here.
We know you will come up with even more ideas on your own.
let's get started.
Let's work on the Hinged Bracelet first.
- Condition your polymer clay and using a pasta machine,
sheet it on a medium-thin setting.
- Choose your silk screen and
paint colour. (Follow the directions that come with the screens and allow
the paint dry).
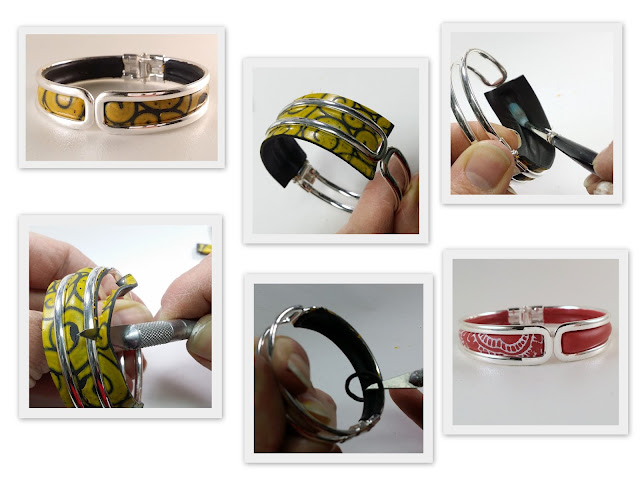
- Cut a piece of clay just a bit
longer and wider than the area you are trying to fill. (Image 2)
- A bit of liquid clay on the
underside of the form will help guarantee that the clay will have a
permanent bond once baked.
- Push the clay against the
bracelet to get a good bond.
- Treat the open area of the
bracelet like a die form. Using a small, soft brush., gently push the clay
between the edges of the form to create a 3D effect (Image 3).
- You can do a little or a lot.
This will depend largely on the consistency of your clay.
- Now it is time to trim the
clay. Work from the front so that you can see where to cut. Then, on
the under-side cut the clay away from the hinge.
- Using your fingers, smooth all
of the edges one final time to make sure that the clay is adhering
everywhere.
- Now using a sharp scalpel or X-acto blade clean up the edges.
- I would suggest baking the
bracelet with just one side done. Once cooled you can complete the
other side.
- Complete the other side in the
exact same manner or use a different surface treatment.
- 1 Gift done!
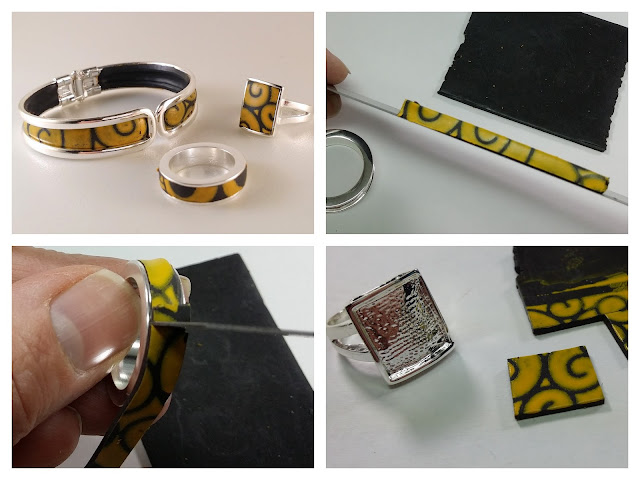
- Lightly impress
the back-side of the decorative clay with the channel ring. This
marks the width you need. Using a long blade, cut a strip. This is
great for using up small leftover bits of your cherished canes.
- Add a bit of
liquid clay to the channel. Press the clay inside the channel and
pull the strip slightly if needed, to stretch the clay so that it fits
neatly inside the channel.
- When the clay
over-laps at the end, use a knife to cut through both thicknesses. Remove
the excess by lifting up the strip and with the sharp tip remove the tiny
piece from underneath. Your 2 edges will butt up against each other
perfectly.
- Smooth the seam.
- Bake
- 2 gifts done!
Now, let's work on the Rectangular Bezel Ring.
- Impress the ring into the back-side of the decorative clay to get a sense of the size of the rectangle you will cut. (This is also sheeted on a medium-thin setting).
- Apply some liquid clay inside the bezel of the ring.
- Place the cut rectangle of clay into the ring. Roll the clay lightly in place. If the clay goes beyond the edge just use your tissue blade to push it back inside the bezel.
- Bake. I told you this would be easy! This ring has a lovey weight to it.
- 3 gifts done!
Last but not
least, let's work on the rolled edge Channel Bracelet

- The clay for
this bracelet is sheeted on a medium thickness.
- Measure the
width of the channel and, using a ruler and a sharp blade, cut a strip
from the sheeted clay.
- Apply a scant
amount of liquid clay inside the channel.
- Place the plain
or decorative strip inside the channel and smooth.
- If plain clay
was used you can now apply texture and lightly rub with with PearlEx powders,
Gilder's paste or similar to highlight the raised design.
- Using the
pressure of your finger (or a sharp knife), clean up the edges of the clay
if needed.
- Bake!
- 4 gifts
complete!
A while back, Tina Holden and I traded. She gave me a few of her lovely silk screens to play with and I gave her a few CaBezel molds to try!
I
used Tina's silk screen's for the projects described above.
You can
find Tina's line of silk screens here
Thanks
Tina!
Can't wait to get started?
Here is a quick reference guide to the supplies you might need to
complete the projects.
Jewelry Forms:
·
Channel Ring
·
Rectangular Bezel Ring
·
Hinged Bracelet Form
·
Channel Bracelet Form
Tools and Supplies:
- Clay
- Liquid Clay
- Tissue Blades
- Scalpel or X-acto Knife
- Paint
- PearlEx
- Gilder's Paste
- Pasta Machine/Pasta Machine Motor
- Silk
Screens:
- Helen
Breil, Create
Along and Sculpey
Kit


