Sunday, May 1, 2011

I'm so proud to announce my new line of rubber texture sheets!!!! (almost!!)

I just wanted to give you the heads up.   I'll soon be launching my own line of rubber texture sheets. I have come up with 5 new designs to start with.  I have MANY more ideas floating around in my head too but I decided to start with just 5. These ones are "same all over" designs. I have worked with most of these in the past in one way or another and I love the results that I achieved so that is how I chose the first 5.
Many of you are familiar with Bev's line of texture sheets "ImpressIT!" Bev has decided not to produce these any more and she has  graciously let me take over  some of her designs. You can see which ones I am taking over below.  I have changed a few of them so that the design will decrease in size from one edge to the other. I'm hoping that I'll have some ready at the end of May.  For now though Shades Of Clay is still offering any of Bev's remaining photopolymer texture sheets. (But once they're gone, they're gone!)


New PolymerCAFE issue

I guess that I forgot to mention it here but the latest issue of PolymerCAFE is out on the newstands now.
 The magazine had a "Steampunk" challenge and the winners were published in this issue.


 The editor thought that it would be a good idea to include a tutorial for some steampunk jewelry in the same issue so my article shows how to make a large pendant using a lot of "upcycled" bits and pieces.(of course it also shows yet another way to use the CaBezel Jewelry Molds. You can see 3 of them used in the piece here)

As part of this tutorial I showed how to create your own texture sheet using some ballchain, a zipper and a few other things to help you create some long thin lines of texture. These lines were then used to wrap around the edge of a clay circle to help create the illusion of an old timepiece or watch.


I have been using molds like these for over 2 years now . I really like the way these thin lines finish off edges.   Here is where the big news comes in.  I have decided to make this idea into a rubber texture and make them available for purchase.  I was hoping that it would be available when the magazine was released but after a few delays it just wasn't possible. I will tell you more about my new line of rubber textures in another post.  I'm hoping that my first group of textures (this one too) will be available by the end of May.

Wednesday, April 27, 2011

Rocky path results

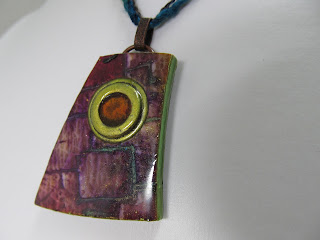
Well, here are the results from the Rocky Path tutorial that I purchased. I managed to make a few dozen pendants. (i even spliced my small bits together 'cause i didn't want to waste any of the yummy patterned clay) Some are strung on ribbon and/or cord while others are hung from cables or chains. I'm hoping to finally use the Etsy account that I signed up for soooo long ago. You can click this link to check up on my progress to see if I actually mange to list any on Etsy
Posted by Picasa

Tuesday, April 26, 2011

Crackle technique with Inka-Gold

I received my 2nd order of Inka-Gold paints.  The colors are amazing.  Unfortunately i haven't had a chance to even unscrew the lids to look at them.  That also means that haven't has a chance to work with them to test to see how permanent they are.  I did however email Trish (of poly clay play where I ordered the paints) and here is what she said Viva Decor states that it is permanent after 24 hours.  I would believe that but, since I like to add just a little shine I almost always use PYM II Spray Varnish
 Of course it's always best to do a bit of your own testing as there are always so many variables but Trish's email sounds pretty promising. I have yet to experiment with the Preserve Your Memories II spray varnish but I will get a can and try it out.  Trish does sell the product however for those of you that prefer to buy in Canada it can also be purchased online here
I did however manage to try the "crackling" technique at the request of one of my guild mates and I am happy to report that it was successful.  For those of you that may not be familiar with this technique, it is simply applying paint, letting it dry and then stretching the clay  by running it the the pasta machine and therefore causing the paint to break apart.  Some paints actually stretch with the clay but i found that if i applied the Inka-Gold thick enough (i did 2 coats on the blue) it crackled quite nicely. (there is only 1 coat on the green side so it didn't crackle as well)

Morrisburg Gathering

For those of you that aren't from around here you may not be familiar with the gathering of polymer artists  in Morrisburg, ON annually.  I have only had the pleasure of attending once but many of the ladies that go are severe devotees going year after year.  The gathering takes place every April and women from all over will drive for hours to get there. From Thursday to Sunday several new techniques are learned  and shared by all.  To learn more about this wonderful annual event click here MPCG  Sandy (from Simple Inspirations ) made a nice pin using the "geometrics" CaBezel mold while she was there. She didn't get to keep to pin for long but you can read about her process on her blog. Here is her pin.


Friday, April 15, 2011

Inka-Gold metallic paints

If you are at all familiar with my work than you already know that I do a lot of faux silver finishing for my jewelry.  I love metallics and mostly achieve this look by applying Eberhard Faber  pulver to black clay.
(Sometimes I use Pearlex powders ) However there is a drawback to using the powders because you have to decide on your desired metallic before you bake. Otherwise the powder won't adhere properly. Then of course you need to apply some kind of protective finish   (Future floor polish or Flecto Varathane) Since silver is my fav, this method isn't always a problem, and typically, at any given time i will have several baked bezels to choose from on my work table. Some are black some are gold or copper but most are silver. Lately
 though, I seem to be coming up with some new ideas for bracelets or necklaces where several of the same metallic finish are required as opposed to ideas for pendants where just 1 bezel will do.  This means stopping my idea in it's tracks to make more bezels!!

Now though, with these paints from Viva Decor i can get around that because this paint can be applied after the baking.
With my latest project I needed figure out a way to cover up the unfinished sides because all of these pendants were cut free hand and not going to be set into Bezels!!  What no bezels!??? (of course i couldn't completely disregard them. They are just used more decoratively this time)


These paints are actually quite dry and can be applied using your finger, a paint brush or even a make-up sponge. The image (below) with the green edge shows how just one application of paint almost perfectly covers up an edge that is actually half white and half black.  Once dry the paint can be polished with a soft cloth to produce a nice sheen.  I'm not sure how permanent the paint is because since I was applying liquid clay to the top I put it on the sides as well.
I'll need to experiment more to find out. I love these paints and I've already placed another order for More yummy colours.  I would suggest buying the trial sizes.  They'll last for a while and you can order more that way!  The paints are available here at Poly Clay Play.  This was my first time ordering from Trish and I was extremely happy with the experience. Trish will go our of her way to make sure that you are happy with your order (thanks Trish) I can't wait to get my new colours. I've already come up with another way to use these fabulous paints and I'm planning to  write up a PDF tutorial for it.  (don't hold your breath though, it may be a while)

Monday, March 21, 2011

Still playing with Rocky Path tutorial

Well here are 2 more examples of what I've used the tutorial for.  And I have another 10 or so ready to be strung.  I find that the finishing is the part that can be so time consuming. Trying to decide if the pendant needs a chain or a cord or maybe some  beads.  In my perfect world I would just get it to the point where i had the pendants finished with some suggestions on the direction the end product should go and then i would hand it over to someone that could finish them for me!! Someone with the knowledge and skill with wire and beads and string!!  Anyone want to volunteer?