
If you are at all familiar with my work than you already know that I do a lot of faux silver finishing for my jewelry. I love metallics and mostly achieve this look by applying Eberhard Faber pulver to black clay.
 though, I seem to be coming up with some new ideas for bracelets or necklaces where several of the same metallic finish are required as opposed to ideas for pendants where just 1 bezel will do. This means stopping my idea in it's tracks to make more bezels!!
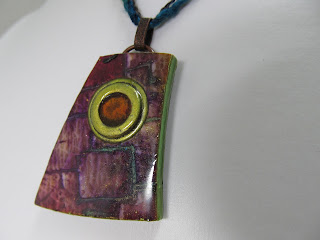
 These paints are actually quite dry and can be applied using your finger, a paint brush or even a make-up sponge. The image (below) with the green edge shows how just one application of paint almost perfectly covers up an edge that is actually half white and half black. Once dry the paint can be polished with a soft cloth to produce a nice sheen. I'm not sure how permanent the paint is because since I was applying liquid clay to the top I put it on the sides as well.
(Sometimes I use Pearlex powders ) However there is a drawback to using the powders because you have to decide on your desired metallic before you bake. Otherwise the powder won't adhere properly. Then of course you need to apply some kind of protective finish (Future floor polish or Flecto Varathane) Since silver is my fav, this method isn't always a problem, and typically, at any given time i will have several baked bezels to choose from on my work table. Some are black some are gold or copper but most are silver. Lately
 though, I seem to be coming up with some new ideas for bracelets or necklaces where several of the same metallic finish are required as opposed to ideas for pendants where just 1 bezel will do. This means stopping my idea in it's tracks to make more bezels!!
Now though, with these paints from Viva Decor i can get around that because this paint can be applied after the baking.
With my latest project I needed figure out a way to cover up the unfinished sides because all of these pendants were cut free hand and not going to be set into Bezels!! What no bezels!??? (of course i couldn't completely disregard them. They are just used more decoratively this time)
 These paints are actually quite dry and can be applied using your finger, a paint brush or even a make-up sponge. The image (below) with the green edge shows how just one application of paint almost perfectly covers up an edge that is actually half white and half black. Once dry the paint can be polished with a soft cloth to produce a nice sheen. I'm not sure how permanent the paint is because since I was applying liquid clay to the top I put it on the sides as well.
I'll need to experiment more to find out. I love these paints and I've already placed another order for More yummy colours. I would suggest buying the trial sizes. They'll last for a while and you can order more that way! The paints are available here  at Poly Clay Play. This was my first time ordering from Trish and I was extremely happy with the experience. Trish will go our of her way to make sure that you are happy with your order (thanks Trish) I can't wait to get my new colours. I've already come up with another way to use these fabulous paints and I'm planning to write up a PDF tutorial for it. (don't hold your breath though, it may be a while)
 at Poly Clay Play. This was my first time ordering from Trish and I was extremely happy with the experience. Trish will go our of her way to make sure that you are happy with your order (thanks Trish) I can't wait to get my new colours. I've already come up with another way to use these fabulous paints and I'm planning to write up a PDF tutorial for it. (don't hold your breath though, it may be a while)


