Pages

Wednesday, December 12, 2012

Two brand new texture sheets!

Introducing my latest texture sheets GROOVY and DRAGON"S BREATH!
Just in time for you to order a little something to put in your stocking ( 'cause we all know that the big guy in red always needs some help.)
GROOVY
This design goes with all things retro or contemporary. Use the entire design with a larger project to get the psychedelic feel or isolate any of its "op art" components in a smaller project. 

DRAGON'S BREATH
This design has a free flowing organic feel. Great when you need something subtle. It starts off small at one end and gradually increases in size to give you more variety. 


Monday, December 10, 2012

Ho Ho Ho!!! A quick tutorial

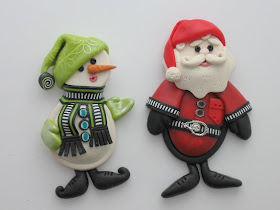
It's that time of year again so I just thought I would remind you of this really basic slideshow type tutorial for creating a "Snowman" or a "Santa" with the "Geometric" CaBezel molds. Great for making ornaments or even gift tags. Ho Ho Ho  You can find it here.


Sunday, December 9, 2012

Pretty at Christmas

This piece made with the "Get to the Point" CaBezel mold was made by Janice O'Grady.
The chocolate ribbon and copper accent beads make it so feminine, and just in time for the holidays.
 
Posted by Picasa

Thursday, December 6, 2012

Leftovers


No, I'm not talking about food silly! I'm talking about all of those leftover bits from extruding clay.  There was a small gathering of them on my table the other day so I decided to lay some down on a piece of scrap clay. Then I used my Lemon-Egg CaBezel mold and made cabochons. Once they were baked, I carved some lines and back-filled them with white clay.
(the gold collar is a piece that i picked up at a thrift store)


Posted by Picasa

For this example I used an All-In-One mold. "Crest"

Sunday, November 18, 2012

Some Sunday Morning Solace

I just had to share this beautiful snippet with you:
Posted: 16 Nov 2012 07:02 AM PST
“You lethargic, waiting upon me,
waiting for the fire and I
attendant upon you, shaken by your beauty
Shaken by your beauty
Shaken.”
~William Carlos Williams
Post written by Leo Babauta.
This morning I awoke, meditated in the quiet dark empty room, and then went to make my coffee.
The world outside is wet, and the raindrops patter upon the leaves of the lemon tree, with its bursts of bright yellow.
My kids and Eva asleep, at peace.
And as I drink my coffee I think of you, dear reader.
And I am struck by the beauty of this world, and the fragile human lives struggling to make their way within it.
And shaken.
The pain and stress and anger and sadness and loneliness and frustration and fear and cravings and irritations that we will experience today … they are made up. We can let them go as easily as they arise. They are unnecessary, if we realize that we've created them for no good reason.
Instead, see the beauty in every moment. In every person’s so human actions. In our own frailties and failures.
This world is a morning poem, and we have but to see it to be shaken by its beauty, over and over.

Friday, November 16, 2012

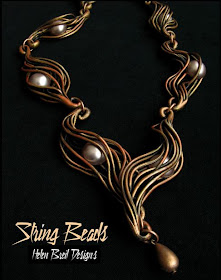
A free tutorial by Helen Briel

For those of you that haven't yet seen this, it's definitely worth taking a look at.
It's a tutorial using polymer clay and an extruder.
Helen Briel does beautiful work. She is one of the founding members of the Southern Ontario Polymer Clay Guild. (SOPCG)


http://www.helenbreil.com/Free_Tutorial.php

Friday, November 9, 2012

``As we get older we get better``


This trailer is amazing! So colorful and inspiring!

Friday, November 2, 2012

A new pendant using "Crest"

This lovely pendant was created by Barbara Colautti.(a founding member of the Southern Ontario Polymer Clay Guild  SOPCG)
She used the "Crest" a-i-o mold to create it.

If you live in the Toronto area and you're looking for some other polymer clay enthusiasts to be creative with then the SOPCG might just be the right place for you. We meet on the last Sunday of every month at the Japanese Canadian Cultural Centre  Don Mills..

Tuesday, October 30, 2012

Happy Halloween

Ah The Macabre

Just in time for Halloween

For those of you interested in the darker side of things...or just the odd, creepy and wonderful!
I've just discovered that one of our Southern Ontario Polymer Clay guild members has opened up a store on ETSY.
Apparently Janice has been busy supplying the darker side.........

Take a look at her store here.


Monday, October 29, 2012

Polymer clay and balloons?

I came across this post today and I just couldn't help  relating this chair to extruded polymer clay!
What sort of images does it conjure up in your mind for clay?
To read more about the balloon chair click here on the Pantone blog.
I've got some extruded clay on my table just waiting for me to turn it into a beautiful bracelet.
I'm forcing myself to finish editing Part 2 of my Soutache Technique video first!!!


Friday, October 26, 2012

Extruded Soutache Technique Part 1

OK. It's finally done.  Part 1 that is. I'll try to finish the rest this week end but no promises!
I would promise but who knows if Windows Live Movie Maker will play nice.  I spent hours editing Part 1 and when it was time to save it, it WOULDN'T!!. I kept getting an error message saying that there was a corrupt file!!! OMG, you have NO idea how frustrated I was.  Yikes. But I finally won in the end.  There are a few blips but nothing too major (i hope)
Using the extruder is soooo much fun.  When I extruded my first strands i fell in love AND I also came up with an idea for a beautiful bracelet.  Once this video tute is complete I'll go back and play with the bracelet some more and  share my results. 


Monday, October 22, 2012

Now available!


The last 3 of the All-In-One CaBezel designs have arrived! 


Just some ideas of what I've done with them so far:


As always, my molds are available at Shades of Clay 

Scroll waaay down to find the new designs.
Don't forget that I'd love to see what you've done with my molds or textures. email me here with your pics!

Monday, October 15, 2012

Polymer Cafe on stands now!

The latest issue of PolymerCAFE is on the stands now!


Check it out for lots of inspiration!
You can see my tutorial on how to make "Caned Bezels" too!


Saturday, October 13, 2012

Extruded Soutache


I'm having fun playing with the "Soutache" technique!

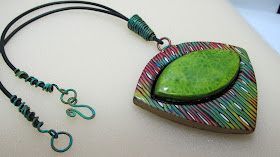
It  showed up in our polymer clay world recently and when I saw it i just knew that I had to experiment with the technique using the All-In-One molds,  The molds lend themselves beautifully to this technique.
Other than an a-i-o mold and your usual clay kit you just need an extruder and some seed beads!
It's so easy!


I used the "Ellipse" mold for this pendant. (i also threw in a "Mini" faux turquoise cabochon/bezel combo that i had lying around)


            Watch for a "How to" video tutorial of how I made this one.

I web cam-ed the making of this  and as soon as I get around to editing it, i'll post the free video tut here and also on my YouTube channel.  (I guess now that I've said it out loud I better make it happen!)


The final 3 shapes in the All-In-One CaBezel mold series will be available very soon.

                                            Here's a sneak peek

"Crescendo"

"Crest"

     As always, you can find all of my products on-line at

 Shades of Clay.  


                    " Ellipse"


.

Wednesday, September 19, 2012

Working with color

I finally have control over my clay!!


                color recipe  index cards 


Well OK, maybe not completely but I've at least tamed the color beast!

There has been a lot of talk lately on one of the polymer clay forums about getting our studios organized.  I recently spent over a week  purging my space. There's nothing like the beginning of the new school year for inspiring so many people to get organized and sorted.

 I was a doll maker before coming to polymer clay full time and even though i know that I will one day get back to using up some of my fabric stash for doll-making, I needed to let go of some things.  Luckily I have a great friend that was willing to take a lot of my stash off my hands( the rest of it went to Good Will).
I now had empty shelves in my workspace so I couldn't wait to get in  there and play.
But then all of this talk about getting organized had me wanting to get my clay stash in order as well  and I was suddenly reminded   that i indeed had a way to do that.

It was last February when i received a great tutorial from Carolyn Good of 2goodclaymates for doing just that.
I was thrilled when i first read through it but like many other things in my studio, it got buried and I just forgot about it.
I am happy (and proud) to say that this past week end i worked my way through most of the 61 page tutorial. I have almost all of the recipes made up and now I'm a changed woman!  No longer will i just rely on my few favourite colors. There will be a plan! (and a recipe!)

With this tutorial when you mix up a color, you use a round cutter to make a sample for your index cards.(i immediately placed the color in the appropriate spot on my  card so I wouldn't lose it.  When 2 cards were filled i baked the samples right ON the card.  When cool enough to handle I glued those suckers in place!)

I went one step further and  made myself a larger square sample as well. I wrote the color mix number on the square and placed it on a tile. When my tile got full i baked it. Now when i am trying to come up with a color scheme i can pour them out onto my table and see which colors prefer to play with each other that day!

I still need to do my Custom Color Wheel Charts but for now I'm sooo thrilled with what I have accomplished so far! Baby steps.
It really is a great tutorial. 

To find out all of the details go about Carolyn's Clay Color System go here.


Monday, August 13, 2012

Fleeting flowers of summer

The air is cooler at night now and the light is fading faster.  I can't believe that soon summer will be behind us.
I do love the summer.  Everything seems easier and more carefree. I could often be found sitting in my backyard under the gazebo working on my laptop. As much as I enjoyed my time outdoors, I can't help but hope that when fall is finally upon us I will find myself achieving more indoors and getting down to business.

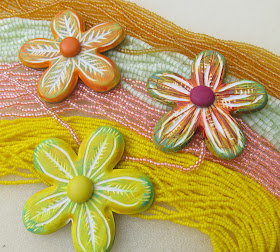
The flowers in my garden may be disappearing but here are some flowers that I made with the "Petals" all-in-one CaBezel mold.

All of these were made using a base of white clay.After baking the clay I carved lines, added PiƱata inks, carved some more and add more inks.  Very simple technique.


Wednesday, August 8, 2012

The Pixelated Retro Blend Cane

Wow!  A gorgeous and easy cane!
If you haven't seen Bettina Welker's tutorial for her retro cane yet, do yourself a favor and go take a look at it now by clicking here.
Last Friday I got together with some friends to enjoy a clay day.  We decided that we would make this cane.  I haven't done much of anything with my extruder yet, but on Friday I was having so much fun I made 4 different variations of Bettina's cane, (of course we stopped for a delicious lunch and a bottle of  wine in there somewhere. Claying makes you thirsty you know!)
Anyway, here are my versions.  I'm not sure what I'm going to use them for yet.  I'll show you when i have something made though.


Thursday, July 12, 2012

Pendants and bracelets, oh my!

Susan White of Calgary has been busy creating with the CaBezel molds.
(The 3 Fab Focals 2 mold was used for these pendants)

 She has even incorporated the infamous "Stroppel Cane" into this pendant 
Susan was generous enough to tell us how she made this faux metal cuff bracelet:
" The cuff bracelet is made over an aluminum blank.  I formed the outer layer with unbaked clay first then added the unbaked bezels to it.  I textured around them and baked.  Then inside of cuff was covered with clay, and baked. I covered the whole outside rim of the cuff with tls, and I used my extruder to get a narrow ribbon of clay. I make sure the ribbon is in good contact with the inner and outside clay layers, and bake. Then I filled the bezels with a veneer I had made, and did a final bake.  After sanding, I used a couple of colours of gilder's paste, was attempting to make the cuff look like hammered metal.  Not sure I succeeded, but was happy with the result."
(The Organic mold was used for the cuff)


I know that this one would look soooo good on my wrist!!!
(The Organics mold was used here)

She used leather cord for this one and knotted it in between.  What a great idea.
(Frame- It  was used for this bracelet)

Thanks Susan!!!!


Friday, June 29, 2012

Tips for other Guilder's Paste addicts

By now, those of you that read my blog know just how much I love using the Guilder's paste!
About the only thing i didn't like about them was having to open up the tin every time i want to see a colour.
Of course i have an idea of what each colour looks like (after reading the name on the tin), but i usually need to SEE the colour next to the project i'm working on before i can decide which colour i need.

That used to involve opening up several of the tins first but not anymore!

I had some small stickers laying around (probs from a dollar store), so i decided that i would rub each of the GP colours onto a sticker and then apply them to the top of tin.

Now when i'm choosing my colours, all i have to do is glance inside the drawer beside me and pick up the appropriate tins.
No more opening and closing!
You can get Guilder's Paste here.

                                                   This is a great waterless hand cleaner. I keep it next to me so that when all of my fingertips are covered with GP i can just squirt a bit onto the ends of my fingers and wipe it off with a cloth. It saves having to jump up and wash my hands several times during a working session. (besides, soap and water doesn't really remove the GP anyway).
It has a nice citrus smell to it and even though it says it contains natural ingredients  (i'm sure it also contains some not so healthy ones as well) it is a bit rough on your hands after a while so use it sparingly (it contains pumice).
 This stuff is also great when working with dirty old steel wire.  It takes the carbon right off my hands so that i don't make everything else that i touch black. (I think this big jug came from a Canadian Tire store.)

Awwwwww

 
Posted by PicasaI just couldn't resist sharing this cuteness!

Wednesday, June 27, 2012

Dragon's eye, Petals and Triad. They're here!

As promised, I have created some samples for you to see with the All-In-One CaBezel molds. 

All 3 of these new designs are available today at Shades of Clay. 

                              Dragon's Eye   

This shape has many possibilities as it can be used both horizontally and vertically. Think polished and elegant or magical, mythological and scaly. (Pair with "Entwined" texture stamp as both can have a scales and serpents theme). 

This cabochon is 2⅜" long and 1" wide. It sits inside a square customizable bezel. Outer dimensions of the square are 2½"x2½". 


The cabochon was made from white clay.  Once baked, I added some yellow Pinata ink. when it dried i applied liquid and re-baked it.  I usually use Kato liquid clay so as soon as it comes out of the oven i hit it with my heat gun until it is crystal clear.
The bezel was just scrap clay that i covered in Guilder's paste.  This time i mixed 2 colors together: Patina and Iris Blue.. I made the steel links and components myself.


                                 Triad 

This equilateral triangle has rounded corners to soften the look and make it more elegant. 

The height of the cabochon is 1½". It sits inside a square customizable bezel. Outer dimensions of the square are 2½"x2½"
I did a transfer on white clay for the cabochon.
For the bezel i kept it the full size. I used my "Entwined" texture stamp.


                                 Petals 

Who doesn't love flowers enough to have them around all year long? 
This cabochon measures 2" across at its widest point and sits inside a square customizable bezel that is 2½x2½"


I haven't had a chance to play with these too much so far but watch for some more ideas from me on how to use them!  OR even better, send me some pics of how YOU use them .  I'd love to put them on the blog.

Click here to see these and my other designs too.


Saturday, June 23, 2012

My first tutorial is up on Etsy!

With so much to do and create around here I have totally ignored my Etsy shop. ( Ok, so it's been years since i've done anything with Etsy and even then i only listed a few items and i let them expire!)
 I hope to change all of that.  I got my mojo back and I'm raring to go!


I've just listed my first tutorial for sale and if all goes well, I may even start to list some of the jewelry I make as samples for the CaBezels.  A girl can only wear so much jewelry herself you know!


This Tutorial is called "Windows to my Soul" 
It uses scrap clay (of course!) combined with Viva Decor Inka Gold paints, Pinata inks and the Blocks and Dots CaBezel mold.


Take a peek!
https://www.etsy.com/listing/102792991/windows-to-my-soul-a-tutorial-using.

I have 2 more tutorials started, they are actually quite time consuming to create (ask my sister, she's the one that put it all together for me .  Thanks Sue!).  Hopefully I'll get them done sooner rather than later.
If you have any questions regarding the Tutorial feel free to email me here.

Coming soon!

Here are the next 3 shapes in the All-In-One CaBezel mold series. These ones will be available soon!

  • Petals
  • Triad
  • Dragon's eye

I have been working on a few samples to show you.  It's odd....I designed these molds so that there would be  lots of clay around the cabochon to turn into an over-sized bezel (frame), but I'm having soooo much fun playing with the big cabochon area that I sometimes even ignore the entire bezel!!!!
Don't worry though, I'll come up with some ideas to show you using the bezel too.